Sunday, January 29, 2012
NEW DAILYPAINTWORKS AUCTION
"Passing Shadows" 8" x 10" oil/linen
I have added "Passing Shadows" to my Dailypaintworks auctions. It is a simple landscape found all along I35 from about Hillsboro to Austin. After the summer heat burns away and it is replaced with the cooler temperatures of fall, the cloud formations become more dramatic and we get hit with these rolling thunderstorms. I think their fun to watch but even more fun to paint.
click here to bid
Saturday, January 28, 2012
FROM DEMO TO GALLERY
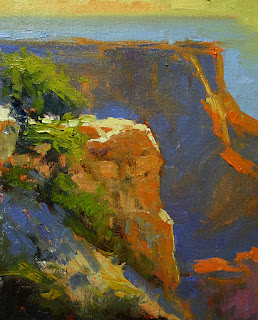
"Canyon Buttes" 12" x 16" oil/linen
I did this painting as a demo for the Richardson Civic Art Society earlier this month. I decided it would be a really nice larger painting for one of my galleries and fresh off my "big canvas....big brushes" experiment I thought it would be good to see if my hard work over the last three weeks will pay off when needed.
The thing that attracts me to this image is all of the reflected light bouncing up from the canyon below. The hot colors in the rock formation in contrast to the blues and purples of the distant buttes make for an interesting contrast.
"Canyon Buttes" 24" x 36" oil/linen
I approached the painting like my recent practice paintings by using nothing smaller than a #10 flat. I really wanted to capture the feeling of the reflected lights and the atmospheric conditions of the haze covering the rest of the canyon. Like all Grand Canyon paintings there is a lot of drawing and if you don't understand how to paint objects in perspective, the Grand Canyon is to be avoided. Total time in this painting is 5 and half hours and I bet half that time was spent correcting the drawing.
I like the painting. For the first time in a long time I felt I had command of the painting from beginning to end. It is always a bit nerve racking to look at a large blank canvas, but once I hit the canvas with my first stroke of paint it went smooth all the way to the end.
Next up is the largest painting I have ever done...a 36" x 60" of Mt. Wilson outside Sedona. I may video the process just for grins.
PREPARING ARTWORK ESSENTIALS EASEL
For Christmas this year Santa brought me an Artwork Essentials EasyL Lite plein air easel. This is my second EasyL. The first is the EasyL Pro version which comes with a place on the back to carry wet panels. I never used this function of the easel so I went to the Lite because it is thinner, lighter and does not have the carrier on the back. I'm getting ready to head into some serious outdoor painting and traveling so I thought it would be a good time to prepare the easel and needing blog material for today...well sounds like a match.
Step 1: Prepare the glass. I went to my local True Value hardware store and had them cut a piece of glass to fit inside of the easel. I then spray one side of the glass with plumber's primer gray spray. I find the dull gray color helps eliminate glare from the sun when painting outdoors. It also helps me properly judge values and colors that I'm mixing. In case you are wondering the answer is "no" I've never had a piece of glass break and I've had my EasyL pro for five years.
Step 2: Insert glass into the easel and seal it in.
I use Kwik Seal Kitchen and Bath caulk. It goes on white but dries clear. This is an important step because the caulk will prevent turps and paint from seeping underneath the glass and it keeps the glass in place.
Ready to go. Booya!
Friday, January 27, 2012
DAILYPAINTWORKS
"Riverwalk Bridge" 8" x 10" oil/canvas
With this painting I am trying something different. Last year I used Ebay as my auction site with fairly good results. In recent months I sold everything I posted so I am pleased with that. I thought I would give DAILYPAINTWORKS a try for a couple of reasons. First and foremost they are less expensive than Ebay. Second the site is run by David Marine, husband to Carol Marine, and a nice fellow. Third I have friends who have had success selling on the site so I am going to give it a whirl and see how things pan out. If you decide to purchase one of my paintings through DAILYPAINTWORKS I would appreciate any feed back on the experience.
So click on the "click here to bid" link and go buy a painting.
click here to bid
Tuesday, January 24, 2012
STUDIO TIP-$20 DRYING RACK
One of the things I want to share this year through my blog is those things I do that save time, money and energy. I have limited storage space and I am committed to keeping my mess to one room in the home and not allowing it to take over other areas in the house until it gets to the point that my studio consumes the home. My mother's favorite saying is "been there, done that, read the book and saw the movie" and that would apply to me having a studio in the home. So I want to share a nifty item I picked up at Best Buy for $20 that I use as a drying rack for paintings.
This gadget is a wire CD rack. It was on the close-out table after Christmas. It is perfect for drying small paintings. I paint mostly 9"x12", but it will hold 12"x16", 8"x10" and 6"X6" as well. It will hold up to 50 paintings.
I'm hopeful that those industrious artists reading this blog will share their studio tips as well.
NEW EBAY AUCTION
"Glare of the Canyon" 8" x 10" oil/canvas
"Glare of the Canyon" is now available at auction on Ebay.
click here to bid
Sunday, January 22, 2012
BEING SELF-CRITICAL
One of the secrets of growing as an artist is to be able to criticize your own work, to be able to recognize the strengths and weaknesses of a painting. Friday I produced the painting below and blogged about the process step-by-step.
"Canyon Shadows" 18" x 36'' oil/linen
As is my custom I took the painting off my easel, turned it around so I couldn't see it and leaned it against the wall. This morning I put the painting back on the easel and took a fresh look at it.
I immediately saw areas of concern that needed changing. It took about an hour to make the changes. Below is the result.
To the casual observer the changes are subtle, probably not even recognizable, but to me they are huge and they can make or break the painting. Here let me show you in more detail.
On the top is Friday's version and on the bottom is today's revision. This is my center of interest so if this fails the whole painting fails. I started off by redesigning the smaller horseshoe canyon on the right. Notice that I shortened the left wall and I made the canyon more horseshoe shaped instead of rectangular and I added a cast shadow. Next I felt the shot of pale yellow where the back wall of the canyon meets the right wall was too cool so I mixed a mustard colored pile of paint and put it there. Now I had to change every single canyon wall in the painting to match. The top painting has warm shadows so I cooled them with some pinks and teals.
The other big change is in the design of the cap on the main horseshoe. Notice I redesigned the cap. I might add that all of this is being done without my photo reference. Now it is about making a painting, not copying the structure of the Grand Canyon.
Now for changes to the lead-in (top is Friday's painting and bottom is my revision). The first thing that struck me was the cast shadow (shown with red arrow) is the same shape as the bluff to its immediate left. How can I be so stupid? So I changed that and then all I did was brighten up the bushes where the light is hitting them, put a few more sky holes in the trees and and more tree trunks and branches. And there you have it. Now I will put this puppy away for a week or two then take it back out and go through the process again. When I look at it and don't see a need for change the painting is done.
Friday, January 20, 2012
BIG CANVAS...BIG BRUSHES...PART II
Today is studio day so I thought I would attempt another timed big painting. Got my big boy brushes and my big boy canvas and a kitchen timer so I am ready to go. This one is of the grand canyon. Let's just go ahead and bite off more than we can chew.
This is my reference projected on a 42" high def TV. The foreground element on the left has been put in with Photoshop....did I mention I love Photoshop? The photo is from my trip to the Grand Canyon two summers ago.
My easel setup with the TV off to my right.
My palette and big boy brushes. The palette is from Plein Air Panels, http://www.pleinairpanels.com
"Canyon Shadows" 18" x 36" oil/linen, Stage 1
The kitchen timer is set at 2.5 hours. I tone the canvas and apply the preliminary sketch. Time...5 minutes.
"Canyon Shadows" 18" x 36" oil/linen, Stage 2
I've decided the lead-in on the left is very important to the success or failure of the painting so I am going to take it close to completion and then the rest of the painting will be done to work with the lead-in. Time... one hour.
Close up of the brushwork.
"Canyon Shadows" 18" x 36" oil/linen, Stage 3
Now I block in the rest of the canyon painting the shadow pattern first then filling in. Time...one hour. Running out of time!
"Canyon Shadows" 18" x 36" oil/linen, Stage 4
Satisfied with the block-in I move on to the sky. I never found a good reference for the sky so this is one of those "make it up as you go based on what your remember" type skies. Time...15 minutes.
"Canyon Shadows" 18" x 36" oil/linen, Stage 5
I now go back to my lead-in on the left and make a few value changes so it fits the canyon part of the painting and I put finishing touches on the trees. Time...10 minutes.
"Canyon Shadows" 18" x 36" oil/linen, Stage 6
I decide I don't like to spot of light in the bottom right.
I feel this is taking the viewer off the canvas so I darken it. DING! Timer just went off.
I'll stop for now. Put it away for a couple of days then come back and look for places to improve the painting.
THANKS RCAS
Pictures from my demo at The Richardson Civic Art Society last Tuesday night.
I've never done a demo in front of so many people. They had a really sweet setup with a video camera and large screen projection so everyone could see the painting regardless of where they sat.
Below is the demo painting.
"Canyon Buttes" 12" x 16" oil/linen
Sunday, January 15, 2012
FIRST 2012 EBAY AUCTION LISTING
"Riverbed Reflections" 8" x 10" oil/linen
"Riverbed Reflections" is my first Ebay auction item.
Just click the link below to bid.
click here to bid
Saturday, January 14, 2012
LARGE PAINTING, LARGE BRUSHES, EGG TIMER PART II
The completion of "Hidden Falls" a 24" x 30" studio painting.
"Hidden Falls" 24" x 30" oil/linen Stage 5, 5 minutes
Time to attack the waterfall and shadow areas of the painting. Using a size 12 hog bristle brush I rapidly throw a dark blue/purple tone up both sides of the painting. It is bluer on the left than on right because my light is coming from up left.
"Hidden Falls" 24" x 30" oil/linen, Stage 6, 15 minutes
Taking the blue and purple piles of paint I mix them together and add white to come up with the waterfall color. I want the waterfall to be mostly in shadow with a bit of distance from the middle section of boulders so I work to create this feeling by painting the distance boulders as if they are covered in the mist of the waterfall. Realizing I have a little more than an hour left on the timer I am moving rapidly from section to section trying to create a flow from top to bottom keeping in mind how I want the viewer's eye to flow through the painting.
Close up views of paint strokes. This is the point in my studio paintings where I typically freeze up, tighten up and generally blow it. I see the smaller brushes sitting next to the palette calling my name...begging me to pick them up and abandon my exercise. SHUT UP you silly brushes.
Sticking with my #12 flat bristle brush I paint in the water pools, finish the waterfall and redesign the bottom of the painting.
"Hidden Falls" 24" x 30" oil/linen Stage 7, 1 hour
I step back and decide the row of boulders going through the middle of the painting are catching too much light so I mix some blue/purple stuff and throw it across the top to cool down the light side of the boulders. This pleases me. DING! Kitchen timer just went off. I finish ten minutes before the timer goes off. Total time start to finish is two hours. You can't see it in the finish but there is a lot of fresh, bold, enthusiastic brush strokes. It is still not at the level of freshness I want but it is a step closer. This is a good first step to where I want my work to go this year.
Tuesday, January 10, 2012
LARGE PAINTING...LARGE BRUSHES...EGG TIMER
"Hidden Falls" 24" x 30" oil/linen, Stage 1, 5 minutes
A couple of weeks ago I expressed my desire to have my larger pieces look as fresh as my outdoor work...Walt Gonske comes to mind when I talk about large pieces that look like they are done plein air. If you have ever looked at one of Walt's paintings up close it is a train wreck of color and paint strokes. But when you walk back ten paces and look at the painting again it is a thing of beauty done by a master painter. I love my outdoor work. I like the way the paint goes on the canvas and I like the fresh look it has. Recently my studio work has suffered from having too much time to tinker with the painting.
So I decided the way to handle this problem is to paint larger canvases with bigger brushes and with a kitchen timer ticking away the time to put myself on a time limit just like painting outdoors. I started my first painting today and decided to shoot photos of it in stages so I can show you the grand experiment whether I succeed or fail. We will do this together.
Up top is my initial drawing. This is going to be (I hope) a waterfall deep in a forest. It is actually a combination of three different waterfalls, all from Yosemite, put together in Photoshop to appear as one waterfall that I am projecting on a 42" TV off to the right of my easel. It will be dark at the top with the waterfall cascading into bright sunlight where I have a series of boulders going across the river then the painting disappears into shadows at the bottom.
The canvas was covered with cadmium orange that will show through the dark boulders and shadows. The drawing was put in with burnt sienna. Notice the directional arrows drawn in to remind me where I want the viewer's eye to travel. Time 5 minutes, brush size #12 flat.
"Hidden Falls" 24" x 30" oil/linen, Stage 2, Time 15 minutes
I start blocking in the boulders painting the darkest darks first and shaping the boulders so that no two are the same, some are cool and some are warm. Time 15 minutes, brush size #12 flat.
"Hidden Falls" 24" x 30" oil/linen, Stage 3, Time 15 minutes
My approach outdoors with a subject matter this complex would be to go to my center of interest and paint it first figuring if I fail at this point I can wipe off the painting and start over or move on to something else. So I decide to do the same thing here and go after the center row of boulders that will be basking in a warm light. I spend time here to render each boulder and then throw in some water just to get a feel for what it might look like against the boulders. Time: 15 minutes, Brush size # 10 flat.
"Hidden Falls" 24" x 30" oil/linen
Here's a close up of my brushwork on the boulders.
"Hidden Falls" 24" x 30" oil/linen, Stage 4, 5 minutes
Now its time to start pulling the painting together and I am feeling good about the center of interest so now I will start at the top and work my way to the bottom. Since the middle of the painting will be warmish in tone I paint the top with a mixture of ultramarine blue, mauve and alizarin keeping it cool and it will appear to be in shadow when finished. I have 40 minutes in the painting at this point and I'm energized to get it completed. My kitchen timer says I have and hour and half left. Stayed tuned....
Monday, January 9, 2012
WORKSHOP SCHEDULE SET FOR SPRING
Its not too early to plan on taking a workshop or two this Spring. I have two workshops and a couple of painting demonstrations scheduled. First up is a demo and a day and half workshop for the McKinney Art League this Thursday and Friday. On Tuesday January 17th (7:00 p.m.) I will be doing a demonstration for the Richardson Civic Arts Society
(www.richardson-arts.org) at the main library.
April 18-21 I will be conducting a four-day plein air painting workshop at Denmohs Ranch. This is a great location for a workshop in the heart of the Texas Hill Country. Period style buildings, barns, Victorian home, Hill Country vistas and river locations gives the class plenty of things to choose from to paint. Contact Dena Wenmohs at http://www.wenmohsranch.com.
May 3-5 finds me teaching a three-day outdoor painting in Port Aransas. Texas. Port Aransas is one of my favorite places to paint because of the variety of subject matter and hey, its the Texas coast. Contact Cameron Pratt at www.portagallery.net.
For more information see my website www.rustyjonesstudio.com home page and click on the Workshop tab. I will posting a supply list and course curriculum on the website soon.
Sunday, January 8, 2012
FRESH OFF THE EASEL
"Blanco River Cliffs" 12" x 16" oil/linen
Last November I taught a plein air workshop in Wimberley, Texas for the Wimberley Artists Workshops (www.wimberleyartistsworkshops.com) I did a demo (seen below) in the morning then the students had the afternoon to paint along the river. The property was made available to us by one of my collectors, Bob Bradshaw.
"Bradshaw's Point" 9" x 12" oil/linen
When the class was done for the day and everyone was packing up to head to dinner, I took the opportunity to walk along the bank and take pictures.
I'm asked all the time whether or not I take a camera with me when I go outdoors to paint and the answer is an emphatic yes and "Blanco River Cliffs" is a prime example. In about twenty minutes I shot over 60 photos to use as reference for later paintings. Without the photos this reference would be lost and in reviewing my pics I see at least four to five other paintings I will get out the twenty minutes of photo time.
I have wanted to do one of these cliff paintings for quite some time. Unfortunately most of this type of landscape is on private property and is hard to find unless you know someone.
Below are two close photos of the painting so you can see my brushwork.
As I look at these close ups I amaze even myself with the expressiveness of the paint application and variety of color. I consider myself to be an intuitive painter meaning I have no real color theory training so the colors I mix are just my reaction to the painting as it progresses. I mix a general color on the palette that I think is close to what I want, put it up on the canvas then either leave it alone because it is spot on or I "bend it" by adding other color to it.
As far as the expressiveness of the paint application...I start out painting thin, then as the painting moves into final stages I usually hit it with really thick paint to either cover up mistakes, or make a bold and decisive stroke.
"Blanco River Cliffs" will be available at Marta Stafford Fine Art when the gallery opens in February.
Tuesday, January 3, 2012
PAINTINGS BRING BACK MEMORIES
"West Texas Horned Toad" 6" x 6" oil/linen
How can such an ugly little creature stir so many fond memories? Anyone who has spent some time anywhere west of Ft. Worth to El Paso has fond memories of catching these passive lizards, putting them in shoe boxes, feeding them ants and racing them. My wife is one of those that will tell you how she and her cousins spent their summers catching horned toads and the races they would have. She can even remember the sweet odor the lizards would put off.
As recent history shows the horned toads have been disappearing due to the intrusion of big red ants from Mexico that compete for the same food source (black ants) as the horned toads and the red ants have been coming out on top for quite some time. I'm glad to report that I recently read the red ants have returned to Mexico and the West Texas horned toad population is growing.
As for the painting...I did it as a surprise for my wife at Christmas. The color palette is off the charts for my taste, but she loves bold colors. Probably the best gift I have ever given her in fifteen years of marriage.
Monday, January 2, 2012
NEW WORK FOR NEW GALLERY
"Hay Stack" 12" x 16" oil/linen
I am pleased to be joining Marta Stafford Fine Art in Marble Falls this month. Marta was the gallery director at Riverbend and has opened her own gallery. I will be taking four new paintings to the gallery this weekend one of which I have displayed here. "Hay Stack" is from a trip I took several years ago to Trinidad, Colorado. I came across this scene when I was lost on some back road trying to find my way back to town. The way the light was illuminating the hay stack caught my eye and I have finally gotten around to doing the painting.
Subscribe to:
Posts (Atom)