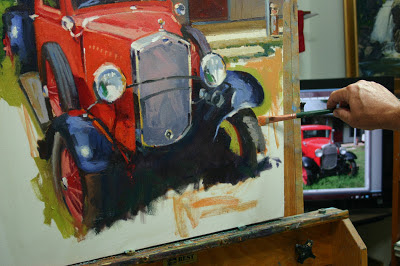
I started with a simple outline sketch. I have a color print of my scene taped to a stiff board. I also have the image on a large high def TV monitor and that is what I look at most while painting. I want the painting to have the feel of a plein air piece and I'm already anxious that because of the subject matter I'll tighten up and lose the feel I want. To combat the need to paint tight I stand at arms length from the canvas and hold the very last inch of the brush handle. This way I can't really control the brush all that well and it keeps me loose.
I jump right in and approach the large canvas as if I am painting on location. I have a kitchen timer ticking off the seconds behind me and it is set for two hours. My plan is to have most of the painting done in that two hour time frame. I start by putting in the shadow patterns. The photo looks like I'm painting in thick black paint but I'm not. The shadows are actually very thin washes of a purplish violet color. The shadow under the roof is painted cool near the top but it warms as it approaches the ground because there is light bouncing into this area from the ground.
I decide to paint from the back forward. I think if I paint the car first and its the wrong color, then the whole painting will be off. So by painting everything else first I will automatically adjust the redness of the car to fit the landscape. Its always good to have a plan. If it doesn't work out I can paint over it. Turns out my plan was a good one.
I don't paint everything up to its final form. I'm really just blocking in the major areas of color and adjusting colors and values as I go. I add a little extra sag to the roof line of the building to give the building some age and also so the straight edge of the roof doesn't compete with the hard edges of the car. I start working on the car.
There's a first time for everything. I've never painted a shiny car before so this is a challenge. I'm trying to stay loose so I boldly put down colors and strokes.
DANGIT!!!! I get to this point and realize the grill between the headlights is off center. Don't know how I missed this in the drawing phase. So I wipe out the front area of the car and redraw it.
Here's a close up view of my adjustment. Compare this to the previous photo and you'll see how I moved the grill to the right a couple of inches.
Satisfied that I have made the proper drawing change, I begin to put in the ground. Under my hand you can see the TV monitor I paint from.
For the grassy ground I premix three pools of paint. A dark brownish green, and lighter yellowish green and a sandy ground color.
I rapidly and randomly throw down the dark greenish brown color. This is the shadow areas under the grass. I also put in the sandy ground color in areas I want dirt to show through the grass.
I go over the shadow areas with the light yellowish green color with the "magic" brush. The bristles on this brush are so crazy I have no way to control it so it gives the painting a real spontaneous look and feel. Exactly what I was going for in the beginning.
I decide at this point that I want the shadow on the porch to be darker which will separate it more from the car. Instead of repainting the shadow on the porch I choose to brighten and lighten the roof, cool the shadow from the tree overhanging the roof and warm up the upper left corner to give it the feel that light is hitting this area pretty hard.
And there you have it. Done. I won't tell you the exact amount of time I spent painting this one, but it was more than the original two hour limit I set for myself, but much less than I had anticipated.


.JPG)
.JPG)


8 comments:
Awesome job on this, I enjoy seeing your step-by-step.
Rusty, the step-by-step was wonderful. I enjoyed it and think you did a fantastic job of painting the scene. I have painted two paintings of antique cars and know how problematic they can be because of the shine as you mention, and also they know if it is not "believable!" Great job!
Helpful info, as usual! Thanks!
I like the strong diagonal that is created from the position of the car in the picture plane. I also like the softness of the colours in the background - they keep the bright red of the car from overpowering the composition. I enjoy seeing your step-by-step work and commentary, it helps me to understand the process.
Great demo. Thank you
Wonderful painting. Thanks for sharing.
Fascinating information I haven’t been experienced such information in quite a long time.
Thanks for sharing this great article! I feel strongly about it and love learning more on this topic. It is extremely helpful for me. I hope you post again soon.
Affordable roof restoration Sydney | Cheap Roof restoration Sydney
Post a Comment