The attention span of our audience was very short but we were taught the reader was much more likely to remember a series of drawings showing a surgical procedure than mountains of text. Little did I know how important that training would become as I pursued my current artistic endeavors. What I learned is simple...it all starts with design. Mother Nature is a really good designer but sometimes she needs a little help when it comes to painting her likeness on a canvas.
To demonstrate what I mean I photographed a recent painting from start to end. By following me through the steps I hope you will come to understand that there is more to copying a landscape to canvas. You must engage the viewer and you do that with design, color and controlling the viewer's gaze.

Coastal Rock Slide Plein Air 9" x 12"
As is my custom I will be painting from the field study I painted on a trip to Carmel a couple of summers ago.

On a 24" x 30" canvas I begin my design by dividing the canvas into thirds ending up with nine equal squares. My objective is to arrange the elements of the landscape in such a way that the viewer's eye will be in constant motion and to do that I purposely place objects where the horizontal and vertical lines intersect.
At "A" the base of the rock lands exactly on the crossing lines. The angled line runs from "A" towards "B". At "B" the vertically angled tree takes you up to the intersecting top third line. The shoreline runs from "B" to "C" where the base of the cliff lines up with the right side vertical line and also lines up with the right side of the main boulder back at "A". The next drawing shows how the eye moves around the painting.
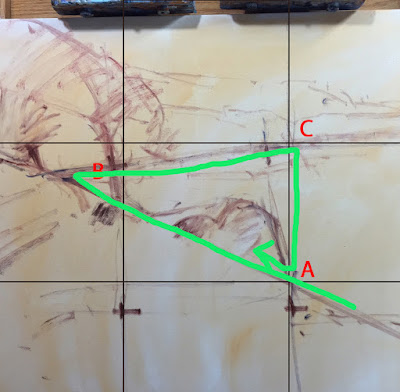

The plan is to have the viewer enter the painting at "A", visually travel to "B" over to "C" then back down to "A" where the process starts over. If I pull this off the viewer will become engaged and visually travel through my entire painting.
You still with me?

Next I lay in a halftone drawing using a reddish wash to give myself a better look at the design before I commit to paint. I decide I need a "visual block" to keep the viewer from sliding off the right side of the canvas so I add a large dark boulder at the bottom right. I will add a dark element to the lower left of the painting to give it some balance. I'm thinking a dark bush of some sort.

I put in my darkest darks in the foreground and paint the main tree. Then using the foreground values as my guide I put in the distant cliffs.

Using my plein air sketch as my value guide I continue to move around all parts of the canvas bringing the distant cliffs, middle ground trees and foreground rock formation all up at the same time.

Detail of the foreground rocks. This was a blast to paint. Most of it is made up as I go, changing colors and shapes of the rocks to give it an organic feel.

The finished painting or so I thought. Once this was finished I put it in a closet for a month and did not look at it again until this morning. Once it was back on the easel I felt something was missing.

I decide it needed something else to draw the viewer away from the rock pile and up the hill to my center of interest. By adding a splash of color on the hill representing the poppies and other wild flowers that grow on the coast I believe the painting is now finished.